Guía Arkime
ARKIME & ELASTICSEARCH
Configuración inicial
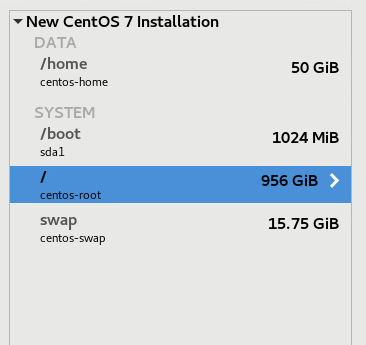
Para realizar las particiones, se selecciona I will configure partitioning, luego a Click here to create them automatically y después se dimensiona centos-root y centos-home.
Se configura el direccionamiento IP de la interfaz de gestión.
Root password: C...*
User: arkime Passwd: C...*
Se instala nano (opcional, se puede usar vim)
yum install nano
Se instala wget
yum install wget
Se instala ifconfig
yum install net-tools
Se instala SSH
yum install openssh-server
Se accede por ssh desde Mobaxterm, y después su root
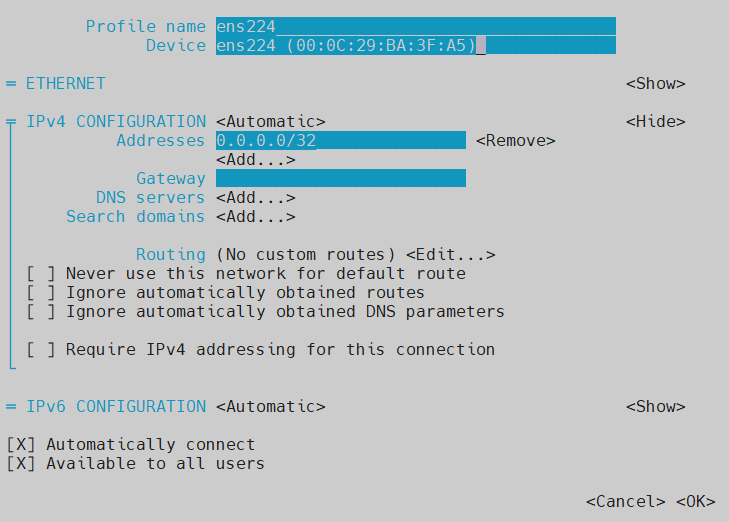
Configurar interfaces de red
nmtui
Asignamos la dirección 0.0.0.0/32 a la interfaz ens224. Marcamos Automatically conenct
Ponemos la interfaz del suricata en modo promiscuo permanente
echo "ip link set ens224 promisc on" >> /etc/rc.d/rc.local && chmod u+x /etc/rc.d/rc.local && systemctl enable rc-local && systemctl start rc-local
Instalación de Elasticsearch
Creamos un archivo llamado elasticsearch.repo en la carpeta /etc/yum.repos.d
nano /etc/yum.repos.d/elasticsearch.repo
A continuación pegamos el repositorio:
[elasticsearch]
name=Elasticsearch repository for 7.x packages
baseurl=https://artifacts.elastic.co/packages/7.x/yum
gpgcheck=1
gpgkey=https://artifacts.elastic.co/GPG-KEY-elasticsearch
enabled=0
autorefresh=1
type=rpm-md
Descargamos e instalamos el RPM de manera manual (utilizamos la versión 7.13.0)
cd /root
wget https://artifacts.elastic.co/downloads/elasticsearch/elasticsearch-7.13.0-x86_64.rpm
rpm --install elasticsearch-7.13.0-x86_64.rpm
Para configurar Elasticsearch de manera que se inicie cuando el sistema se arranca, escribimos los siguientes comandos:
systemctl daemon-reload
systemctl enable elasticsearch.service
Iniciamos elasticsearch:
systemctl start elasticsearch.service
# En caso de que lo queramos parar: systemctl stop elasticsearch.service
Por defecto, el servicio elasticsearch no crea logs en systemd journal. Para activarlos, la opción --quiet se debe quitar del comando ExecStart en el archivo elasticsearch.service
Borrrar --quiet en /usr/lib/systemd/system/elasticsearch.service
Para mostrar el registro de logs:
journalctl -f
# journalctl --unit elasticsearch
# journalctl --unit elasticsearch --since "2016-10-30 18:17:16"
Para comprobar que la instalación de elasticsearch es correcta, se hace una petición
curl http://localhost:9200
Y tiene que salir al final del chorro "tagline" : "You Know, for Search"
Descomentar http.port: 9200 de /etc/elasticsearch/elasticsearch.yml
Para cambiar la configuración de JVM en elasticsearch, creamos un archivo adicional donde asignamos la memoria virtual de JVM.
As a general rule, you should set -Xms and -Xmx to the SAME value, which should be 50% of your total available RAM subject to a maximum of (approximately) 31GB. Set Xms and Xmx to no more than 50% of your total memory.
Para ello escribimos
nano /etc/elasticsearch/jvm.options.d/configuracion.conf
#esto se hace porque el archivo original no se puede modificar
A continuación escribimos en ese archivo la memoria asignada. Lo abrimos con nano y ponemos:
Instalación de Java
En primer lugar, descargamos el RPM de java de la página oficial de Oracle. Para ello, buscamos en google " Instrucciones de instalación de Java en Linux x64 RPM https://www.java.com/es/download/help/linux_x64rpm_install.html Ahora se descarga el paquete "Linux x64 RPM" y se arrastra con Mobaxterm a la máquina. Se crea en la máquina un directorio para la instalación y se copia allí el paquete.
mkdir /usr/java
cp RPMdejavaarrastrado /usr/java/
Para instalar el paquete, nos colocamos en la carpeta que contiene el archivo y escribimos
rpm –ivh nombredelarchivoarrastrado
Establecer la carpeta donde guardar los PCAPS posteriormente
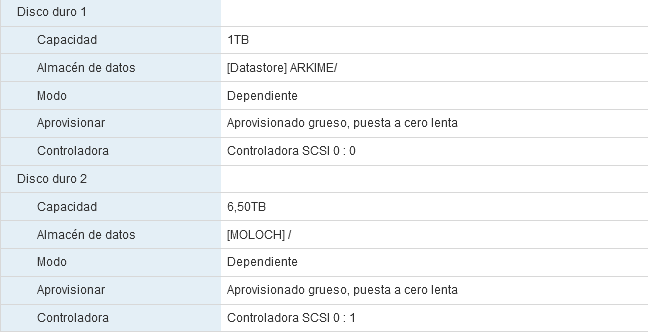
Debido a que se utiliza un NAS, se tiene que crear la partición que contenga el directorio donde se guardan los PCAPS. Añadimos un HDD virtual a la máquina que esté ubicado en el NAS, para guardar los pcap.
- Creamos la partición y formateamos
parted /dev/sdb
(parted)mklabel gpt
(parted)mkpart primary xfs 0 -0
(parted)print
(parted)quit
mkfs.xfs /dev/sdb1
- editamos el fstab para que se monte al inicio
mkdir -p /mnt/arkime/data
nano /etc/fstab
Añadimos esta linea en el documento:
```bash
# device-spec   mount-point      fs-type options  dump pass
/dev/sdb1       /mnt/arkime/data xfs     defaults  0    1
¿Qué significa?
#device-spec – The device name, label, UUID, or other means of specifying the partition or data source this entry refers to.
#mount-point – Where the contents of the device may be accessed after mounting; for swap partitions or files, this is set to none.
#fs-type – The type of file system to be mounted.
#options – Options describing various other aspects of the file system, such as whether it is automatically mounted at #boot, which users may mount or access it, whether it may be written to or only read from, its size, and so forth; the #special option defaults refers to a pre-determined set of options depending on the file system type.
#dump – A number indicating whether and how often the file system should be backed up by the dump program; a zero #indicates the file system will never be automatically backed up.
#pass – A number indicating the order in which the fsck program will check the devices for errors at boot time:
#      0 - do not check
#      1 - check immediately during boot
#      2 - check after boot

- damos permisos a la carpeta
 chmod -R 777 /mnt/arkime
 chown -R nobody:root /mnt/arkime
Instalación de Arkime
Para instalarlo, descargamos el instalador.
wget https://s3.amazonaws.com/files.molo.ch/builds/centos-7/arkime-3.1.1-1.x86_64.rpm
yum localinstall arkime-3.1.1-1.x86_64.rpm
ejecutamos script de configuracion
/opt/arkime/bin/Configure
Escribimos el interfaz promiscuo ens224
A la sugerencia de instalar un Elastic, escribimos no
Le decimos el servidor de elastic al que lo conectamos http://localhost:9200
Password to encrypt S2S and other things [no-defaults] C...*
Download GEO files? yes
inicializamos la db de arkime
/opt/arkime/db/db.pl http://localhost:9200 init
añadimos usuario admin
/opt/arkime/bin/arkime_add_user.sh admin "admin" C...* --admin
Cambiamos la carpeta en la que se guardan los PCAPS
nano /opt/arkime/etc/config.ini
Comentamos el directorio por defecto y añadimos el creado.

Cambiar a 15% el espacio libre que activa el borrado de pcaps.

Ejecutamos los servicios
systemctl start arkimecapture.service
systemctl start arkimeviewer.service
systemctl enable arkimecapture.service
systemctl enable arkimeviewer.service
Ver los logs
tail -f /opt/arkime/logs/viewer.log
tail -f /opt/arkime/logs/capture.log
Crear tarea programada para borrar índices
nano /etc/crontab
#Se añade la siguiente línea
 0  0  *  *  * root /opt/arkime/db/db.pl http://localhost:9200 expire daily 60
Abrir puertos del firewall
firewall-cmd --zone=public --add-port=8005/tcp --permanent
firewall-cmd –-reload
Ajustar la hora en caso necesario
Poner la hora <date –set ""2021-11-27 17:39:00">
Acceder a la interfaz web
http://IPmáquina:8005
Comandos útiles
Comprobar discos lsblk -io NAME,TYPE,MOUNTPOINT,SIZE,FSTYPE,MODEL